How to customize an Android home screen, part 2: Shortcuts and icons

With the basics of Android launchers out of the way, it’s time to go in-depth with the various aspects of customizing an Android device. First up is shortcuts and icons, which are more complicated subjects than many people realize.
Shortcut basics
Shortcuts in Android are single-space universal “links” to applications or actions within Android. They consist of thee basic components: The icon, the name, and the path that they open when clicked on. Unlike widgets, which can also work as shortcuts in many cases, actual shortcuts are standardized in the way these three components work.
They will always take up a single icon space in your launcher, any settings you apply to icons in general (such as text color for the name, or image size for the icon) will be applied to all the icons, and they can be used in places where widgets can’t – like folders, lock screens, or inside widgets. Moreover, many launchers and other applications that utilize shortcuts will allow you to rename shortcuts and give them different names, whereas any widget needs to have that functionality built into it.
In a nutshell, shortcuts are “dumb” in that they’re just links with an image and a name attached to them, while any widget is inherently a small app. This simplicity can be a godsend in many cases, which you’ll see later in the article.
Two types of shortcuts
There are two types of shortcuts in Android: Application shortcuts, and action shortcuts.
Application shortcuts are just that, shortcuts to applications. You click it, and the application launches as if you were to find it in the app drawer and click it there, or open it from Google Play.
Action shortcuts are a bit more complicated. These link to specific parts of an application, or even commands within applications. Examples include being able to open an ebook instead of an ebook reader, a playlist instead of a music player, a web page instead of a browser, or direct call a contact instead of opening the phone dialer/contact list.
Action shortcuts

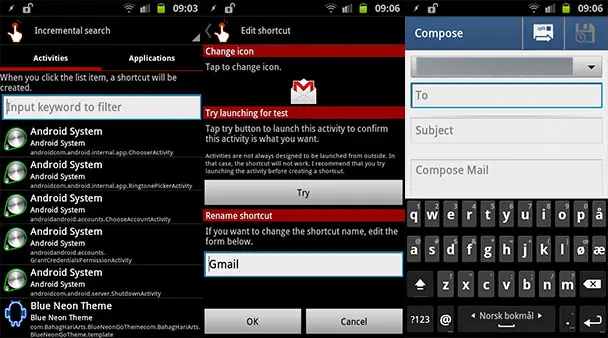
Knowing how to use and access action shortcuts is important in order to get the most out of your Android device. Most launchers and other applications that support shortcuts (e.g. lock screen replacements) support action shortcuts, but the name varies between apps. In GO Launcher EX (left part of the above image), it’s split into Apps and Shortcut right from the start. ADW Launcher EX (right part of the image above), on the other hand, separates between Shortcut and Custom Shortcut on that level, the difference being whether or not you can customize the icon and name. The actual app/action choice isn’t made until the next screen, where Applications is just the top choice in the list of action shortcuts.
In the end though, the list in ADW Launcher EX and the Shortcut option in GO Launcher EX both show the available actions on your device. This list is populated automatically as you install apps that offer action shortcuts. Many apps offer this option, but to my annoyance, Google doesn’t always offer it in its apps.
It’s always a good idea to become familiar with the action shortcut list on your device, as you might find you want an action shortcut instead of an application shortcut. If you always skip past the main menu of an app to get into a specific feature, then perhaps there’s an action shortcut that will bring you right there.
 Some apps will also offer action shortcuts for internal task commands. Some examples are visible in the image to the right, where Sync Now, TeslaLED Toggle, and WidgetLocker Lock Now are all commands that can be used through action shortcuts. To use the TeslaLED Toggle as an example, TeslaLED is an app that lets you turn on or off the camera LED on your device, allowing you to use the device as a flashlight. It offers both the action shortcut you see on the right, as well as a normal widget.
The advantage of the widget is that it’s dynamic, changing when you turn the LED on and off in order to convey which state it’s in. There are also more options for how it looks, like you can see in the left part of the image below, which is the TeslaLED widget’s configuration screen.
The action shortcut on the other hand, is slave to the rules set by the launcher, which means that it will look and act like the other icons. This can be important in order to give your home screen a unified look, keep all icons the same, enable or disable all text labels at once (or customize how they look), switch out the icon with completely different ones, and so on. Action shortcuts can also be used from withing widgets and other apps, like for instance WidgetLocker. The right part of the image below shows my WidgetLocker setup, where the TeslaLED Toggle action shortcut is being used as one of the options in the unlock ring, complete with a custom icon that fits the rest. Including a toggle widget in that unlock ring isn’t possible.

Launcher actions
If you go back to the image of ADW and GO Launcher at the beginning of the Action shortcuts section, you’ll perhaps be able to make out the “GO shortcut” option in GO Launcher EX and the “Launcher Actions” option in ADW Launcher EX. Both of these are very typical for many launchers, and they’re essentially launcher-exclusive action shortcuts. The concept is the same as with action shortcuts, but they only work within the launcher you find them in.

The above image shows what each of these two options contain. You have things like opening the app drawer, access themes, preferences, and switching between screens. The latter is what people use when they create hub style home screens (which I’ll cover in a later article), where clicking on shortcuts rather than swiping is used to jump between screens/pages. The reason why they have their own section in most launchers is that they can’t be used from outside the app, e.g. you can’t use GO Launcher EX’s Preferences shortcut to open GO Launcher EX preferences from ADW Launcher EX.
Accessing intents through actions: QuickShortcutMaker
Android uses something called intents, which are similar to action shortcuts, but not available in a convenient menu. Intents are used to communicate between apps, or internally in apps, or between an app’s widget and the main app. Most of these intents are of no use to the average consumer, but sometimes there are intents that can be used action shortcuts.
 The simplest way to do this is through QuickShortCutmaker, a free app that allows you to search all the available intents on your device, try them to see what they do, and then turn them into shortcuts. I have a full article written on this app here, but the short version is that you enter your launcher’s action shortcut list, pick the QuickShortcutMaker action, and then the UI will lead you through the rest of the configuration. If there’s an app you wish had an action shortcut, but doesn’t, it’s a good idea to try this. For instance, the task manager I use, Astrid, has an intent that launches task creation, but no action shortcut that does the same. By using QuickShortcutMaker, I was able to turn that intent into a working shortcut.
Download (QuickShortcutMaker): Google Play
Create your own action shortcuts with Tasker
No article by me is complete without mentioning Tasker. You can do a lot with Tasker, and anything that can be made into a Tasker task can be made into an action shortcut. That’s a list longer than the Bible, so I’ll just use my own Tasker-based action shortcuts as an example.

Above is three different Tasker-based action shortcuts.
The first is the current version of my self-made popup settings box. It’s made using Tasker’s Scene functionality, and has controls for various phone profiles, brightness, adding a task to Astrid, toggling TeslaLED, on/off buttons for my computer monitors, and a button I press when I’m done writing articles for the day in order to stop some automated Pocketables-related Tasker tasks from running when there’s no need to. This popup box is activated with an invisible (more on that later) action shortcut that uses Tasker’s Task Cut action to run a task which in turns activates the popup.
The second one is my WidgetLocker lock screen once again. The left most icon on the unlock ring launches the Basic Remote remote in Unified Remote, using the method I wrote about a couple of days ago. To quickly recap, Unified Remote has an action shortcut feature to allow you to make shortcuts directly to specific remotes in the app, but due to how it’s implemented it won’t work with anything that isn’t a launcher at this time. A Tasker-based solution allows you to circumvent this and add a remote shortcut to places like WidgetLocker, like I have.
The third one is the Android voice input box. In this case, the voice input box is part of Nelly, my self-made Tasker-based voice assistant. Nelly is available on the home screen using the same method that I use for the settings box: An invisible action shortcut that runs a Tasker task.
These are just three examples of what you can do with Tasker and its Task Cut action shortcut. From toggling settings to auto-replying to SMS, if you can make a Tasker task for it, you can make an action shortcut out of it.

I say Tasker task and not Tasker profile because by definition, a Tasker profile is a task that is being triggered by a phone event or state, like the phone ringing, or an app being opened. As such, you can run a task using an action shortcut instead of using a context and a profile, or even have a task that is triggered by either a context or an action shortcut, but profiles are by definition self-contained trigger/action combinations and as such can’t be run by anything but what the trigger is. To put it another way, you can spin the wheel manually, or let the engine do it, but in this case you can’t spin the engine to spin the wheel. You can, however, activate and deactivate profiles using action shortcuts.
Download (Tasker): Google Play
Icons
With the basics of shortcuts out of the way, it’s time to turn to how you can make the shortcut look good, which is all about icons. Icons are tiny images that represent the app, and unlike iOS, you can actually customize these on Android – at least if you have the right launcher. Most third party launchers allow you to change the icon of a shortcut, and there are two basic sources for new icons: Themes and icon packs, and “loose” image files.
Themes and icon packs
Themes and icon packs are two sides of the same coin. Icon packs are basically what the name suggests, packs of icons that you can use. Often these packs come as part of a theme, which also includes some other bits and pieces like wallpaper, dock backgrounds, and color settings.
Themes and icon packs can be used in two different ways: As all-in-one solutions, or as libraries for manual customization.
All-in-one solutions
If you apply a theme to a launcher, or anything else with icons, then the theme will (automatically or manually) provide icons for the apps it contains icons for. The reason why I put that last part in bold is that this is the reason why I rarely pay much attention to themes. Themes will normally include icons for the most common apps, like Facebook, Gmail, browser, and so on, but the moment you get an app that is a bit more niche, most themes will fail. Horribly. Here are some examples:


The above theme is the official Sketch Theme for GO Launcher EX. In the close-up, you can see that it has added a common sketch-styled rounded off square to all the icons, which is a very common way of compensating for not being able to provide icons for all apps. It looks quite good in the app drawer, where all the icons use this style. However, as you can see from the right part of the close-up, the situation is quite different when you add icons to your home screen and start using the icons that came with the theme. There are nice, sketch-styled icons for the browser and Gmail, but not Minecraft and Netflix. When you load up the icon selector for the icon pack that came with the theme (top image, far right), you see that the theme only includes 14 actual icons!
The idea is that these 14 icons will cover the apps that most people have on their home screen, but personally, that would never have been enough for me. If you’re like me, you would then have been left with the choice or using mixed icons (ugly), removing some icons from your home screen (not practical), not using those icons at all, or making additional icons yourself. The latter is possible, but the more “specific” a theme is, the harder it is to match the style. E.g. it’s easy to match a theme where all icons are just grayscale versions of the original icons, but harder to match sketched icons like above.
It’s worth noting though that themes can be used for what they do to the non-icon parts of the launcher. Above, examples are the icons that are part of the launcher, like the home button in the app drawer or the app drawer tabs.
Libraries for manual customization
Even if you don’t want to apply themes and icon packs, having them installed can benefit you. Many launchers allow you to replace individual icons with icons from installed icon packs, which are either part of themes or just standalone icon packs. Some non-launcher apps even allow you to tap into icon packs for other launchers, like WidgetLocker which allows you to use GO Launcher and ADW Launcher icon packs. Unfortunately icon packs and themes for specific launchers don’t work with other launchers unless compatibility has been added, so themes and icon packs are unfortunately not universal. I’ll get into how to circumvent this later.
 The benefit of having multiple icon packs and themes installed this way, is that many styles are very similar. If you want to make a home screen with pink icons, installing multiple pink themes or icon packs gives you several icon libraries to choose from, thus increasing the chance that you’ll find icons for the apps you need icons for. If you look at my WidgetLocker unlock ring to the right, you’ll notice that the icons doesn’t follow the same style as exactly as they appear to at first glance. What you’re actually seeing in that image is no less than four different icon sources: Two icon packs, WidgetLocker’s built-in icons, and a gray-scale version of an app icon.
Turning proprietary themes and icon packs into universal ones
One of my favorite icon packs is from the ADW.Elegant Theme. Aside from being the gray-scale/silver look I like, it has so many more icons than your average icon pack. Almost no matter what app you have, there will be either an icon that is made for it (e.g YouTube, Audible), or one that fits anyways (e.g. a generic folder icon for a file browser).
The problem is that this theme is for ADW only. While several other apps can tap into those icon packs, GO Launcher EX can’t. The solution to that problem is quite simple: Extract the theme .apk file! Android .apk files are like Windows’ .exe files, they are program files. When an app is installed on Android, these files end up in the root file system, specifically in /data/app. If you’re rooted, you can get there quite easily, and then browse to the .apk you need by going through the list of apps, which are listed using their process name (meaning they’re called something weird like com.google.gmail.
Root Explorer is a great app for getting to this directory, and it also has the ability to extract these .apk files directly. Long click on the .apk, then select Extract All, and click to go to the extract location when it’s done. Now you have a copy of the .apk, fully extracted, meaning it’s now a folder you can explore to see what was in that .apk file. Any icons that the app has will be in the /res folder, sorted into more sub-folders based on what device DPI it’s meant for. For apps, you’ll find their main app icon in here, so that you can use it elsewhere or modify it (like making it gray-scale like I did). For icon packs and themes, you’ll find loads of icons in there, namely all the icons the theme/icon pack contains.
![]()
Remember that what you’re doing here is a bit iffy, legally speaking, as you’re tearing apps apart. However, as long as you do it with apps you’ve downloaded legally, and for your own use only (meaning do not distribute the contents to anyone), it shouldn’t be a problem.
 Like I said though, this requires root. If you don’t have root, you can technically extract .apk files on your computer using a program like 7-zip, but this requires that you get your hands on the .apk. Since grabbing .apks off your own device requires root, you’re almost back at square one. I say almost, because you can often get .apk files elsewhere, even legally, but I won’t go into detail on that.
Download (Root Explorer): Google Play
Finding icons online
Themes and icons packs aren’t the only ways to get icons. There are millions of icons online, not just for Android, but going back years for other OSes and uses. Sites like xda-developers and deviantART are classic sources for icons, and there’s always Google. Image searches in particular can help you find specific icons, by searching for e.g. “gmail icon png”. You should include “png” in such searches in order to get .png files, which allow for transparent backgrounds. Without transparent backgrounds, the icons are either square, or will end up being square when you use them. The same principle about distribution applies to anything you find online though, and it most certainly wouldn’t hurt to throw people a “thank you” if you use their icons.
Making your own icons
Making your own icons is always a possibility. This can be as simple as turning an existing icon gray/blue/pink/whatever, or as complex as creating an icon from scratch. Again, .png files are your friends, allowing you to create icons with transparent backgrounds. Photoshop (or similar programs) will help you immensely here, if you know how to use it.
Applying “loose” image files
Extracted icon packs, custom icons, and icons you find online all go under the “loose” image file category I mentioned above. You end up with image files that you need to get onto your device somehow. My advice is to use something like Dropbox to store all icons you end up using, as well as extracted image packs. This allows you to keep track of them, as well as access them on any device. You can long-click files in Dropbox and save them to favorites, which will download them to the device. They should then pop up in the Android image gallery with an album name identical to the Dropbox folder they were in.
Getting those icons into shortcuts is a process that depends on the launcher (or other app). Both GO Launcher EX and ADW Launcher EX now allows you to do that for any shortcut, though AD Launcher EX still has a separate “custom shortcut” option (that you saw earlier) from the old days. A few updates ago though, GO Launcher EX moved its custom image option into a tiny icon at the top of the theme icon browser, like you can see in the video above.
Also note that you’ll often be asked if you want to crop an image when using custom images. This is meant as a tool to help you if you’re e.g. using an action shortcut to direct dial a person, and wants to use a picture of them as the icon. When you’re applying actual icons, however, No Crop is the option you’re most likely to need.
Invisible shortcuts
One of my favorite tricks is invisible shortcuts. I have several of these on my home screen, tied to features I use a lot and know where is. This includes Nelly, my popup settings, and a task manager.
(The audio error is because the screen recorder is using the microphone when the voice input box is trying to access it)
To make a shortcut invisible, you need two things: A blank .png image, and a way to remote the name label. You can get the first by right clicking on this text and saving the image it links to. It may appear white or black when you view it, but when you use it on an icon, it will be transparent.
As for the name label, there are several methods of handling that. You can tweak the label settings in your launcher (if it has that option), turning off the labels or making them transparent. This will, however, affect all shortcuts. The better solution is to rename the shortcut to nothing, assuming your launcher allows you to do that. If it doesn’t, try to rename it to a blank space instead. Some launchers allow for neither of those two options, however, which is why I included the label settings method.
Name labels and other settings
![]()
There isn’t a whole lot to be said about customizing the name labels. This is a feature that is fully in the hands of the launcher, but many launchers have options to customize this part, as well as other aspects of displaying the icons. Font, color, icon size, label visibility, icon style, and so on are all possible options you might find in your launcher.
The icon size setting is work noting, if you have it. Going back to icon grids in the first article, you may have to change both icon and label (font) sizes to fit icons into a larger grid. The rule of thumb is that making icons smaller is easy, but making them bigger can be a problem if there isn’t any image data available for those extra pixels, making the icons blurry.
In conclusion
Shortcut and icons seems like a simple topic, but there’s a lot of stuff to cover to really get down and dirty with how it works and how to use the system to your advantage. Like I’ve hinted at in this article, widgets and shortcuts also often overlap in functionality, and it can be confusing to know when to use which. This is something I’ll talk more about in the next part of this series, which will be about widgets.
