Beginner’s guide to Tasker, part 7: Variable arrays

Back in part 4 of the guide, I briefly mentioned variable arrays. I said then that I wasn’t going to go into more detail, as it would only complicate things. Now that we’re a few iterations of the guide further along, however, it’s time to dwell into this yet unexplored part of Tasker variables.

Index
- What’s an array?
- Referring to arrays
- How arrays are created
- For loops
- Example: todo list V2
- In conclusion
What’s an array?
Arrays are common in many areas, from mathematics to programming. In Tasker, an array can be described as a base variable which have several child variables. When you use Variable Split on the variable %Hello, you end up with a bunch of child variables like %Hello1, %Hello2, %Hello3, etc. %Hello is then an array with several elements, each element being a variable in itself.
So far nothing new, perhaps with the exception of the terminology – we’ve been using child variables throughout the guide. Each element in an array is a variable, so it can be used as a variable, which is how we’ve been using arrays for so long without calling them that. However, what makes arrays special is what you can do with them in addition to what you can do with normal variables. Because variables in an array is arranged in a way that can very easily be referenced, we suddenly have a whole new set of tools that we can use to manipulate the variables on an array level, rather than treat them as individual variables.
To use arrays, you need to get out of the mindset as variables as single entities. When referring to an array, it’s common to either refer to them by their base variable (like %Hello) or in the format %Hello(). The former is accepted as the input into several array-specific action settings in Tasker, some of which we’ll look at later. %Hello() on the other hand will list the value of each variable in the array, separated by a comma.
If you were to split %ingredients = sugar.milk.flour by the period, you’d end up with the array %ingredients containing %ingredients1 = sugar, %ingredients2 = milk, and %ingredients3 = flour. Adding a Flash action for %ingredients would then flash sugar.milk.flour, because the value of the single variable %ingredients is still sugar.milk.flour. Flashing %ingredients() however would tell Tasker to take the value of each child variable and separate them with a comma, so you’d get sugar,milk,flour. If you were to clear the variable %ingredients and repeat the flashes, you’d get an empty %ingredients on the first, and the same sugar,milk,flour on the second. This is because the array remains even though you cleared the variable that created it in the first place. If you similarly were to clear the array %ingredients, the first flash would be unaffected, while the second would just flash empty variables.
This can be a bit confusing, because %ingredients can refer to the single variable %ingredients or the array %ingredients. Perhaps the most common mistake when dealing with arrays is to refer to one when you mean the other, causing whatever you do to be based off a single variable instead of an array, or vice versa.
Referring to arrays
Since arrays are numbered lists of variables, you get some new ways to refer to them. The list of these ways are available in the official user guide, so I’ll just quote them here:
If the four variables %arr1, %arr2, %arr3, %arr4 hold respectively a, b, c and d then we have an array with 4 elements. These variables can be used just like any other, however it is also possible to access them in special ways. Here are some examples:
- %arr(#)
The number of defined array elements (4 in this case) - %arr(#>)
The index of the first defined array element, or 0 if none are defined (1). - %arr(#<)
The index of the last defined array element, or 0 if none are defined (4) - %arr(#?b/c)
A comma-separated list of the array indices (lowest to highest) with matching values, or 0 if none match (2,3 in the example) - %arr(>)
The contents of the first defined array element (a) - %arr(<)
The contents of the last defined array element (d) - %arr() or %arr(:)
All of the array elements separated by commas (a,b,c,d) - %arr(2) or just %arr2
The content of the element with index 2 (b) - %arr(2:4)
Contents of defined elements with indices 2 to 4 (b,c,d) - %arr(:3)
All the defined elements with indices up to 3 (a,b,c) - %arr(3:)
All the defined elements with indices starting from 3 (c,d) - %arr(1:2)
All the defined elements with indices from 1 to 2 (a,b)
Keen eyes might recognize the first of these, %arr(#). That’s because we used it in an example in part 5 of the guide, to count the number of lines in a text files. What really happened was that we read a text file into an array, each line being a new variable in the array. Using (#) behind the base variable then makes Tasker count the number of variables in that array, which in turn is the number of lines.
You will of course also recognize %arr() here, which is the same as what we just talked about above. These methods listed above show us different ways of referring to arrays, allowing us to for instance refer to the last element in an array without knowing what number that is.
One method that is missing here (because it’s not exclusive to arrays) is the format %arr(%variable). Assuming you have a %variable with a numerical value, you can refer to the array element in that spot in the array by using this format.
How arrays are created
As for how you make arrays, I already covered Variable Split. I’ll once again quote the official user guide on this, since it has it pretty much nailed down:
- using
Variable Split:
Variable Set %arr a,b,c,d
Variable Split %arr
If your data has commas in it, you can separate the values with e.g. @ and specify @ also in theVariable Splitaction. - by assigning individual elements with
Variable Set:
Variable Set, %arr3, c. - using
Array Pushto add an initial element - some other actions also create arrays for their results e.g.
List Files
Variable Split is perhaps the most common source for arrays, although some other actions, like List Files mentioned here, can also create them. Other than that, you can also create them manually with Variable Set or Variable Push.
For loops
The For and End For actions are found together with If, Else, and End If actions in Tasker. Like If/End If, For/End For creates a group inside the task, where nested actions are visible nested in that group. The initial For action can be a bit confusing, but once you get a hang of it, it’s actually very powerful. It asks you for a variable, as well as a comma separated list of items. For each item in the list, the For action will run the actions in the For group with the current item as the value of the specified variable. For instance:
For, Variable: %itemtoflash, Items: hello,world,how,are,you
Flash: %itemtoflash
End For
This would loop the group, in this case the lonely Flash action, one time for each item in the list, in this case 5 times. Each time, the variable %itemtoflash will be updated with the next item in the list, starting with “hello”, ending with “you.” 5 flash messages appear, each with one of the items from the list.
The benefit of this system is that you can specify a set of actions and then run a whole bunch of values through it without needing to duplicate the actions for each time. It takes some getting used to, as you for instance need to make sure that if you save something with each, that file name has to be unique for each item.
Example: Todo list V2

Recently I decided to redo my entire todo list system (which is described in part 3 of the guide) to give it better performance and more features. The system I came up with uses arrays at its core, and is quite a bit more effective than the old one. I also added a new generic todo list that doesn’t trigger any alarms, along with redoing my three situation-specific lists. I’m going to cover the generic list here as the trio adds a bit of complexity to it all.
The first todo list system I created in Tasker used methods that weren’t ideal. Adding to the list was done by saving to a text file, a file that was read into a single variable and showed in a text field. The benefit of this was that the list would be formatted for reading in the text file directly, each line being separated by a line shift, and with no use for a more direct splitter. The downside was that the entire list became a single entity, making single selection impossible and whatnot.
The new list is based around arrays. Each list is still stored in a text file, but the text file is more of a backup feature than it is the main storage for the items. Instead, the items are stored in a global array, which is directly compatible with the text file by writing %Array() to the text file (writing the value of each array element, separated by a comma), and reading it back into a variable which you then split by the comma (reverting it back into array form).
The array can then be used as the source for a menu scene element, which most people are familiar with through the Menu alert action, which automatically populates a scene with such an element for you. You can use that element on its own as well, and by using an array as the source, it creates a menu list where each array element is an item in the list. The items in the list can both be selected and tapped, which means that we suddenly have the tools needed to make the todo list a bit more like a third party todo list app – i.e. each item can be selected.
Trigger task
 There’s quite a bit that’s needed to make this work, starting with the trigger task. It looks like this:
- Read File, File: gentodo.txt To Var: %Gentodo (reads my generic todo list text file into a variable)
- Variable Split %Gentodo, Splitter: ,
- Variable Set %Gtselectedd to 0 (resets a variable used later. Double D is not a typo)
- Array Pop %Gentodo, Position 1, If %Gentodo doesn’t match ++ (removes the first entry in the list if it’s blank. I frankly don’t remember the circumstance where that was needed, but I’m sure I had a reason for it when I did it)
- Show Scene Generic Todo
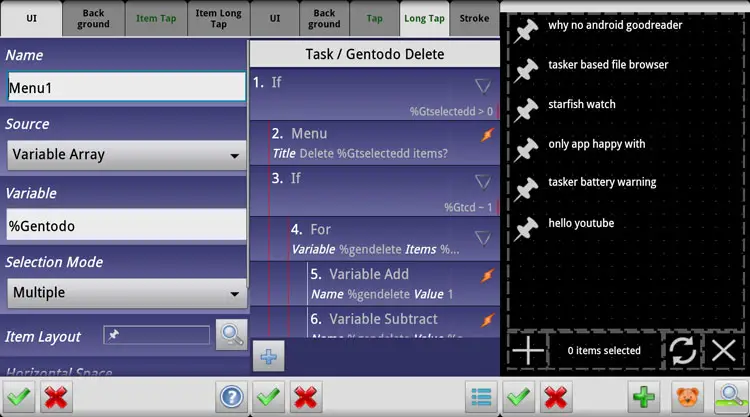
The scene: Menu element
The menu element is the heart of the scene, covering most of it. Source is here set to Variable Array, and Variable is then %Gentodo. Note that since source is an array, variable refers to the base variable of the array in order to also know what the array is. Had it asked for a variable, %Gentodo would have been treated as just that single variable. Selection Mode is set to Multiple, since I wanted to be able to select multiple items.

Note that menu scene elements have internal scenes. The Item Layout option has a scene besides it that can be clicked and edited. It determines how each item looks, and it’s pre-populated with a dynamic text field and a dynamic icon field. Those will be populated with data from the menu element’s source, but you can still use this to choose how it will end up looking. You can also add more to it yourself. My generic todo list has a static image of a holo themed pin in front of the text field, which ends up looking like a bullet point when the menu element is fully populated. Aside from having a few predetermined elements, this internal scene is the same as the scenes you’re used to.
 The Item Tap tab task for the menu scene element contains the following:
- Variable Set %Gtselected to %select_indices
- Variable Split %Gtselected, Splitter: ,
- Variable Set %Gtselectedd to %Gtselected(#)
%select_indices is an automatically generated variable (one of four, the other three being %select_labels, %tap_label, and %tap_index) that is populated when you interact with the menu scene element. It contains a comma separated list of the item number of the selected items, starting at 0 (this will be changed later). So, if you select items 1, 3, 5 on the list, %select_indices will show 0,2,4.
%Gtselected(#) counts the number of items in the array %Gtselected, which is then put into %Gtselectedd. In short, %Gtselectedd shows the number of selected items.
So, by the time you’ve selected something in the menu scene element, you have an array with the numbers for those items as well as a variable with the number of items selected. That brings us to the delete function.
Warning: There’s currently a bug where %select_indices doesn’t clear itself if you deselect the last item. As such, there’s no system here to handle that situation. Basically, as it is now, you have to refresh the entire scene to properly deselect the last item.
The scene: Delete button
 The delete (X) button in my scene has two functions: simply cancel out of the scene, and delete items. The first is handled by a simple Destroy Scene in the Tap tab task. Deleting items is more complicated, and is triggered by holding down on the button. The actions in the Long Tap tab task are as follows:
- If %Gtselectedd > 0
- Menu, Title: Delete %Gtselectedd items?, Item 1: Yes (Variable Set %Gtcd to 1), Item 2: No (*nothing*)
- If %Gtcd matches 1
- For, Variable: %gendelete, Items: %Gtselected()
- Variable Add, Name: %gendelete, Value: 1
- Variable Subtract, Name: %gendelete, Value: %shuffle, If %shuffle doesn’t match *shuffle*
- Array Pop, Variable: %Gentodo, Position: %gendelete
- Variable Add, Name: %shuffle, Value: 1
- End For
- Write File, File: gentodo.txt, Text: %Gentodo()
- For, Variable: %gendelete, Items: %Gtselected()
- End If
- End If
- Variable Set %Gtcd to 0
- Variable Clear: %shuffle
- Variable Set: Gtselectedd to 0
So, lots of nested stuff here. The first If simple makes sure that there are selected items before you try to run some delete task on them. Keen eyes may have noticed that while we reset %Gtselectedd in the launch task, there’s no Variable Clear for %Gtselected. That means that the last values in the %Gtselected array persists, however, because the entire delete task is nested in an If for %Gtselectedd (which is reset every time), we won’t ever get a situation where we accidentally delete last time’s selected items. On top of that, it effectively disables the Long Tap task if nothing is selected.
The Menu action that sits as the first action in the If group must not be confused with the menu scene element that I’ve referred to so many times. This action simple creates a new pop-up box using the standard menu action, in this case with Yes and No items in order to create a simple confirm dialog. Clicking Yes sets a variable that the following If group is dependent on. That variable is also reset at the end of the task, so that it’s always 0 unless you click Yes to confirm deletion.
Next we have our For loop. It runs the four nested actions once for each element in the array %Gtselected. The Items field here wants a comma separated list, not necessarily an array, so we give it the %Gtselected() form. For each element in the %Gtselected array, the value of that element will be written to %gendelete, used in the following four actions, and then it goes on to the next element, putting its value in %gendelete, and so on.
As for the four nested actions, the first simply fixes a “developer brain fart.” Right now, menu items start at 0, while array elements start at 1. So, the value of array element 1 is the same as menu item 0. This will be fixed soon according to the Tasker developer:
Will fix that, it should be the same as the tap indices obviously.
It’s going to cause problems for some people’s scenes, but it’s too silly to leave like that.
By adding 1 to %gendelete, which in turn contains the number for the selected menu item, we bring that number up to the level of the array, so that menu item 1 is the same as array element 1.
When those two match, it becomes very easy to remove things from the array, using the third action in the For loop, Array Pop. By simply using Array Pop with %gendelete as the position, we pop out the array that’s in that position in the list. The other elements in that array then get pushed down so that if you remove the third array element in a five element array, number four becomes number three.
Wait, you skipped an action! Yes, on purpose. The second action in the For loop, combined with the fourth, fixes an inherent issue with this system. The first time the loop runs, the array element numbers will match the menu item numbers, once we have added 1 to compensate for the difference in starting position. However, because all the array elements get pushed down when we remove an element, the numbers won’t match after the first time!
Let’s say we have 10 items in the list/array, and we select number 3 and 5. %select_indices will then show 3,5 (always in order, no matter which one you select first). The For loop then pops element 3 from the array, leaving us with 9 elements, where the previous number 5 is now number 4. When the For loop then comes around to pop number 5, it pops what was number 6 when you selected the items
To fix this problem, we add 1 to %shuffle at the end of each loop. %shuffle then represents the number of times the list has been shrunk. The Variable Subtract action in spot two of the group subtracts this number from the number of the element we’re going to pop, but only if %shuffle actually has a value (the If condition takes care of this). If we delete 5 items, then the number of the fifth item will have to be adjusted down by 4 in order to match up.
When the loop is done looping, it’s time to write the changes to the file. Unlike the first version of the todo list, we here overwrite the entire file, because we have all the information in the array – so the file is outdated. By writing %Gentodo() to the file, we write a comma separated list of items to it. When we then read that back into a variable, and then split to an array the next time we open the scene, we simply split by the comma.
At this point we end both our If groups and move to the three actions that can always run, if only for the sake of it. We essentially clear %Gtcd, %shuffle, and%Gtselectedd, so that they’re ready to go next time. I didn’t actually think %shuffle needed clearing since it’s a local variable, but it turns out that if you were to delete something in several batches while in the scene, %shuffle would continue counting with the last used value if not cleared.
The scene: Selected item indicator
There’s a text field on the bottom of the scene showing “%Gtselectedd items selected.” It’s as simple as that.
The scene: New item button
 The button to add a new item isn’t very complicated. The Tap tab task looks like this:
- Variable Query, Title: New item, Variable% gentoadd
- If %gentoadd doesn’t match *gentoadd*
- Array Push, name: %Gentoadd, Position, 9001, Value: %gentoadd
- Write File, File: gentodo.txt, Text: %Gentodo()
- End If
This task is simple. It starts by using the Variable Query action to ask the user for the title of the item to add. It then does an If check to see if something was actually entered into the variable. If so, it uses Array Push to add that to the array. By specifying a very high position (it’s over 9000), you’re pretty much guaranteed that the array is smaller than that, and in those cases, it simply adds it after the last one. So, if you have a 10 element array, then add a new item, it will become number 11, not number 9001. After that, it writes the changed array to the file.
A nice side effect of using arrays is that when the file contents are read into the variable, a comma that you put in is treated the same as a comma that originally separated array elements. This allows you to add multiple items in one go by adding an item in the format 1,2,3,4,5. Once added, it will show as a single list item with all numbers in one, but when the list is refreshed (scene destroyed, relaunched) each of the items seperated by a comma will be its own item. This does mean you can’t use commas in the titles as the title will then be split, but I think the benefit of being able to add a bunch of items in one go makes up for that.
The scene: Refresh button
Alerts
This is my generic list, which is new (I used to just use a widget), but the three other lists I have (home, shopping, morning) also use this new array system. The basic concept is the same, just slightly different to accommodate three lists in the same scene.
Those three lists all have different alerts, so you’d assume that those needed changing – but they don’t really. They all work by reading the contents of the file, checking to see if there’s anything in the file, then acting based on that. Items are now separated by a comma instead of line shift, but that doesn’t affect the alert systems.
AutoRemote integration
All my todo lists can now be added to remotely from AutoRemote. This system had to be changed when I redid the todo system itself. The format for adding is the same, i.e. “todo tag=:=item name,” just with the addition of a generic/universal list tag. The task that activates upon receiving a message in that format then has four If groups that are all identical except for the variables and file paths being adapted to each list. The If condition for each group is then a match with the appropriate tag. For the universal list, this group looks like this:
- If %arpar2 matches generic/universal
- Read File, File: gentodo.txt To Var: %Gentodo (reads my generic todo list text file into a variable)
- Variable Split %Gentodo, Splitter: ,
- Array Push, name: %Gentoadd, Position, 9001, Value: %arcomm
- Write File, File: gentodo.txt, Text: %Gentodo()
- End If
By now you know what all of these do as they’ve been used before. The only real difference is that it pushes %arcomm into the array instead of %gentoadd. Like I said, there are four such groups in the same task, one for each of my four lists. At the end, independent from the If groups, is this:
- Say “Item added to %arpar2 list”
AutoRemote Chrome integration

So far I’ve only used the AutoRemote Chrome plugin to copy text from my browser to my phone. I thought I would make it easier to add items to my list, so I simply added a bunch of rules to the Chrome plugin. Each rule has a name that doesn’t really matter, and a command like “todo shopping.” This then allows me to select text in Chrome, right click, and send to my todo list (receiving end is the same as above). It’s a very handy option to have, as I can just go to any search field (like on google.com), type something in, right click it, and send to any of my lists.
Video
Update: Tasker beta 1.3.2b2 and above
Turns out that the array/menu numbering difference and the deselect bug have both been fixed in the latest Tasker beta, which means that the next release version will also have them fixed. The change in the todo list is that you don’t add 1 to %gendelete with the fix, and the Item Tap tab task in the menu scene element should be like this:
- If %select_indices doesn’t match *select*
- Variable Set %Gtselected to %select_indices
- Variable Split %Gtselected, Splitter: ,
- Variable Set %Gtselectedd to %Gtselected(#)
- Else
- Variable Set %Gtselectedd to 0
- End If
In conclusion
Arrays and For loops can save you a lot of hassle. Right now there’s something of an issue with global arrays and menu scene elements, where the whole thing slows down significantly because the global variables have to be set all the time. It doesn’t matter much on a small todo list, but in a later article I’ll show how to make a Tasker-based file browser, where it does matter. I originally made such a browser using arrays and found it to be extremely slow, and after some help from another Tasker user, it turned out that arrays were extremely inefficient in that particular situation. There may very well be a V3 of this list somewhere down the line, as I already know several ways to speed it up. Even so, the current iteration works great, at least for my use.
