How to use AutoNotification and AutoRemote Notification for Android/Tasker
![]() The Auto series of apps by developer joaomgcd have been heavily featured on the site before, and now that I have a phone on Jelly Bean, I can use more of it. The first thing I tried out was AutoNotification, a new Tasker plug-in that allows you to send much more complex notifications than Tasker in itself can, including Jelly Bean-specific features.
The Auto series of apps by developer joaomgcd have been heavily featured on the site before, and now that I have a phone on Jelly Bean, I can use more of it. The first thing I tried out was AutoNotification, a new Tasker plug-in that allows you to send much more complex notifications than Tasker in itself can, including Jelly Bean-specific features.
Update: An additional article with more tips for this is available here.
AutoNotification vs AutoRemote Notification
AutoNotification is a standalone app, but some of its functionality is actually also available in the flagship app, AutoRemote. If you have AutoRemote, you will have a Tasker action named AutoRemote Notification in your Plugin list in Tasker, and this works similarly to the stand-alone AutoNotification plug-in. Essentially, you can give AutoRemote AutoNotification’s functionality by specifying “myself” as device in the AutoRemote Notification settings.
While their functionality might end up being identical at some point, there are however some differences at the time of this writing. Currently, AutoRemote Notification is missing the following features available in AutoNotification:
- Persistent notifications
- Custom status bar icons
- Custom button icons (Jelly Bean)
- Local images for icon and picture (Jelly Bean)
I will write the rest of this post with the focus on how AutoNotification works, so just keep in mind that with the above exceptions, it should work with AutoRemote Notification as well.
Video tutorial:
The video below goes through the same as what’s further down in the article, but shows it in practice.
Basic concept

The concept behind AutoNotification is that you can use Tasker to create notifications. This is already available in Tasker as the action Notify, but the difference is that AutoNotification fully supports the notification options introduced in later versions of Android. This includes the ability to put buttons, images, icons, and more text in the notifications.
AutoNotification Message?
Five of the options found in the configuration screen refer to something called “AutoNotification Message”. These work the same way that AutoRemote messages/commands work, i.e. that they’re used to trigger profiles and/or transfer information. If you add a new profile in Tasker, you will notice a AutoNotification context under State->Plugin. This context will trigger when there’s an AutoNotification message available, assuming that the message matches its filters (if any). You set up filters in the AutoNotification context configuration, and the basic use is fairly straight forward. If you specify “hello” in the message filter, it will trigger on messages that say “hello”. You can read more about how this system works in the guide to AutoRemote, which uses the same format for messages.
Available options
The following options are available in the AutoNotification action configuration screen. You can use as many or as few of them as you’d like. Some of these are only available on Jelly Bean and above.
Title: Notification title
Text: Notification text
Ticker: The text that scrolls across the notification bar when the notification appears. If empty, it will use the Text field above.
Message: An AutoNotification Message that is sent when the notification appears.
URL: URL that is opened when notification is clicked
Action: An AutoNotification Message that is sent when the notification is clicked (replaces the URL option if used)
Icon: Icon to use in the notification. This can be an internet address or a local file.
Status Bar Icon: An icon to appear on the status bar. Currently you can choose between a range of internal icons, but not specify your own.
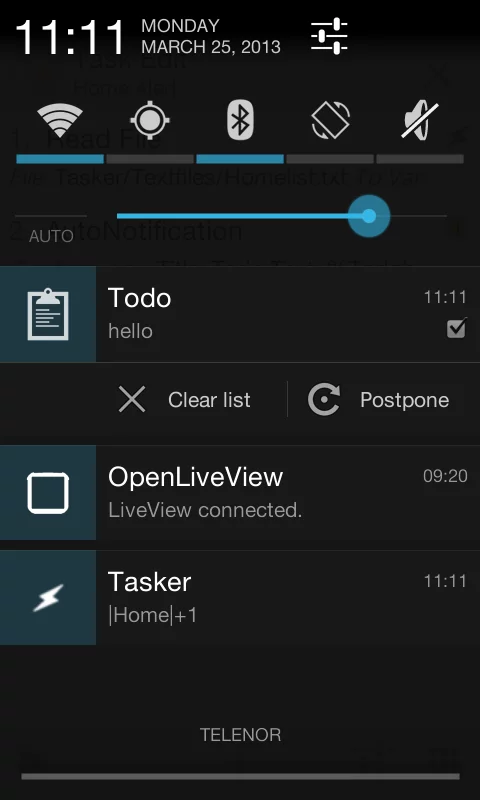
ID: An ID to refer to that specific notification. You can use this to have one notification replace another (use same ID), and it’s needed to the persistent notification feature (see below)
Persistent: If checked, the notification cannot be removed by the user the normal way. Instead, you have to run a Tasker task with the action AutoNotification Cancel, and specify the same ID as the persistent notification, in order to remove it. This is highly useful for (semi-)permanent notifications that you don’t want to accidentally remove.
Sound: Sound to play when the notification appears.
LED: Settings for phones with a notification LED
Vibration Pattern: Similar to Notify Vibrate in stock Tasker, this allows you to specify a vibration pattern for when the notification appears. You specify this as alternating numbers for how long to pause and vibrate, in milliseconds. For instance, “1000 1000 1000 1000” will make it pause for a second, then vibrate for a second, then be quiet for a second, then vibrate for another second.
Picture: A large image for big picture notifications, like you see when you take a screenshot. Same format as for Icon applies.
Share: Will make an Android share button appear in your notification.
Action Button 1/2/3: Allows you to add buttons to your notification, where the message specified here will be sent as an AutoNotification Message when the button is clicked.
Action Label 1/2/3: Specifies a name/label for the specific button
Action Icon 1/2/3: Specifies an icon for the specific button. Same restrictions as for Status Bar Icon.
What to do with it?
This is a very powerful feature that has a lot of uses. In the video at the top, I explain how I’ve used it for my todo list app that I made in Tasker, by using the ability to add buttons to create more powerful notifications. Since you can tie buttons to whatever Tasker can do, there’s no limit to what you can make it do. You can create your own music control widget, create a home automation control widget, create quick wife messaging widget with predefined messages, create a panic button notification, and so on and so forth. Tasker’s own Notify action only allows for a single task to be run, i.e. from clicking the notification itself, and this expands that to a maximum of five AutoNotification Messages.
AutoNotification is free, with a $1 in-app purchase to unlock the full functionality. The free version has some limitations that are listed in the Google Play description.

Download: Google Play
