Beginner’s guide to Tasker, part 1: Tasker basics

Update: This is the original first part of the beginner’s guide, and it covers Tasker from the viewpoint of the now old UI that’s only used on pre-ICS Android devices. An updated version of this guide is available here. As well as UI-related differences, the new version is also much newer in other ways, like references to other posts and examples. Pick the version of the guide that fits the version of Tasker you’re using, which depends on your Android version.

A part 0 has been added to the guide, talking about what Tasker is and how you can go about learning it. It’s available here. This part of the guide therefore jumps straight into talking about how Tasker itself works.
Tasks, profiles, projects, contexts, scenes, variables, and actions
These seven terms are important to understand in order to use Tasker.
Actions
An action is the most basic part of Tasker, a thing that the app does. Switching off WiFi is an action, going back to the home screen is an action, starting Angry Birds is an action, turning down the media volume is an action. Tasker have over 200 basic actions, and most of them have configuration options that make them capable of doing different things, like how the Media Controls action has five different options for which button it should emulate. Linking actions together allows you to do some truly amazing things with Tasker, things that go far beyond changing a setting or two when you leave the house.
Tasks
Actions are grouped in tasks. As an example, my Outside task has three actions: One for setting screen brightness, one for alerting me of items in my shopping list, and one for updating an online status file to say that I’m not home. Tasks can also be triggered with actions, so that a task can have several actions that run individual tasks, each with their own actions. This way you can group actions together into more meaningful tasks, and it allows you to reference a set of actions from different tasks. For instance, I have a task with several actions that update a widget, and this widget update task is used as a part of other tasks where updating the widget is necessary, like my reboot profile. Tasks can be triggered either by contexts, or directly using shortcuts, widgets, and other methods.
Contexts and profiles
A context is a trigger. An incoming notification, the opening of an app, or connecting to a certain WiFi network are all examples of contexts which can be used to trigger a task. If you want the GPS to turn on when you leave the house, you could for instance use not being connected to your home WiFi as the context, and have that trigger a task with an action that turns on GPS.
Unlike tasks, contexts can’t “live on their own.” They’re always the first part of a profile, and a profile consists of up to four contexts and one or two tasks. A profile is what links tasks and contexts together, deciding which task should run when the context triggers. Depending on the type of context (state or event), a profile can be active continuously or only momentarily. In cases where there are multiple contexts in a single profile, the relationship between them is AND (e.g. context 1 and context 2), meaning that both contexts have to be fulfilled in order for the profile to trigger. If a mix of event and state contexts are used, the profile will follow event profile rules.
An example of a state context is being connected to your home WiFi connection, in which case the profile is active as long as you’re connected. In such cases, tasks can be either enter or exit tasks, which decides whether or not the task runs when the profiles becomes active (enter task) or when it deactivates (exit task). Some actions, specifically actions that change settings, automatically revert to their previous state when the profile deactivates, without the need to specify that in the exit task. An example is screen brightness, and if a profile’s enter task sets the screen brightness to 100%, it will automatically go back to the old value when the profile deactivates.
Update: Rich from the Tasker Google Group points out that the actual task connected to the state context-based profile only runs once – when the profile becomes active. This is true, and a very important point. A profile that has only state contexts will be active as long as the context is met, however, the enter task will only run once. This means that if you for instance set the screen brightness using the enter task of a state profile, it’s possible for other apps and Tasker tasks to change the screen brightness while the profile is still active, without the profile being aware of this. In other words, settings will only persists if nothing else tampers with them. That means that it’s really the exit task that is unique with state context based profiles, as well as the ability to revert some settings automatically when the profile becomes inactive.
Another important thing to be aware of is that an exit task can sometimes run before the same profile’s entry task, if that entry task has a Wait action that delays part of the entry task for so long that the profile becomes inactive.
In an event profile, on the other hand, there is no continuous state. Receiving an SMS message is an example of an event context, triggering the profile momentarily to make the attached task run once. Such profiles can’t have exit tasks since there is no time difference between when the profile activates and deactivates (there’s no practical difference between when you start receicing an SMS message and you’re finished receiving it). Furthermore, it’s impossible to have more than a single event context attached to a profile. The reason is that since an event context by definition lasts only a split second, and the relationship between contexts is AND, having two event profiles would make the profile trigger only when two split second events occur at the exact same time, which isn’t likely to ever happen.
When an event context is used together with state contexts in the same profile, the profile becomes an event profile, like I mentioned above. In those cases, the profile triggers momentarily when the event happens, but only if the state contexts are fulfilled. For instance, you could have a profile with an SMS received event and a WiFi Connected state for your work’s WiFi network in order to automate what happens when you receive an SMS message at work.
You can also have up to four state contexts in a profile without an event context, in which case the profile is still a state profile. All the state conditions then have to be fulfilled for the profile to be active.
Variables
A variable is like a virtual text file within Tasker, or like a variable in math. A variable is represented by a % symbol followed by a name, like for instance %Variable1. Variables are used to get access to system information, transfer information between parts of Tasker, and even work as settings and options. The variable %DATE will for instance always be the current date, so if you were to tell Tasker to create a notification with the text %DATE, then %DATE would be replaced by the actual date when the notification appears. I’ll go into this in much greater detail later.
Scenes
A scene is essentially a customized user interface. You can user Tasker’s scene functionality to create menus, pop-ups, settings boxes, and much more. This is a very useful and complex feature that I will also cover in greater detail later.
Projects
A project is the final grouping in Tasker. Think of it as a folder capable of holding all of the above, so that you can keep everything related to a specific Tasker system in one place. The more complex Tasker setups often use multiple profiles, multiple tasks, and even multiple scenes all working together. You can group all of those together in a single project to stay organized.
The Tasker screen
Tasker has a beginner mode that is designed to make the app easier to use for beginners, by disabling certain features. Unfortunately, this sometimes causes problems because you end up having people refer to features that aren’t visible in someone else’s Tasker. As such, I’ll be basing this guide on the normal Tasker look, not beginner mode. To deactivate beginner mode, go to Tasker preferences (by clicking the menu button on your device), the UI tab, and uncheck beginner mode.

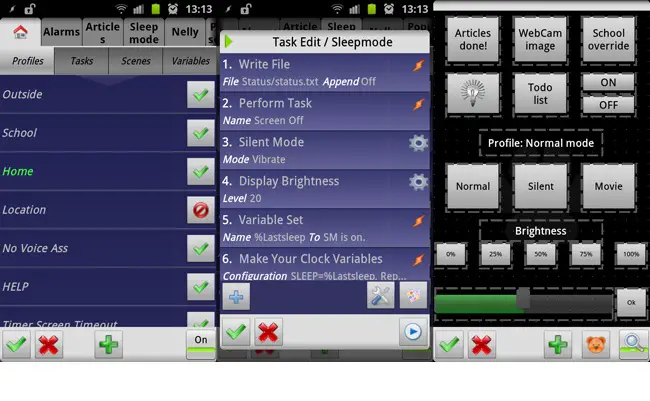
Knowing the difference between the various terms I explained above is half the battle when it comes to understanding how the UI works. The image above should help explain what everything is, but there are a few things I want to point out. The arrow you need to drag to hide/show the project tabs can be very hard to see, and very hard to grab even if you do see it. If you don’t see the top row of tabs from above, it’s because it’s hidden, and you need to try to find that arrow if you want to use projects to organize everything.
The icons next to profiles indicate whether a task is enabled. A green check mark means that it’s enabled, the red circle with a line going through it means it’s disabled. I point this out because some think the symbol indicates what will happen when you press it, not the current state. In the image above, you hence see one disabled profile and three enabled ones.
The single profile whose name is green above (Home) is currently active. A profile being active means that its context conditions are met, like if you have a location based profile and is currently at that location. That profile would then be inactive if you leave the location. If it’s disabled however, it won’t ever become active no matter if the context conditions are met. Profiles which contain event contexts cannot be continuously active in this way, as mentioned above, but then can be disabled to prevent them from triggering.
Finally, it’s worth mentioning that holding down on parts of the UI is the way to access a lot of features. It’s the way to import and export items, add more contexts to a profile, switch out tasks, turn enter tasks into exit tasks (or vice versa), and so on. Also, to delete items, you grab the right part of the screen besides their name (where the enable/disable icons ae for profiles) and drag them down to the trash can that appears. This is also how you sort items and transfer them to other projects: drag and drop.
What Tasker requires to work
When Tasker is active, there will be a constant notification icon present in your notification bar. This is to make sure the system will never close Tasker, as Tasker obviously needs to run at all times to work. This notification also shows which profiles are currently active, which is a quick way to keep track of your state profiles.
Some features in Tasker, specifically the ability to read notifications from other apps, require that Tasker has accessibility access. This is a system-level access that you have to manually give to Tasker by going to the device’s main system settings, accessibility section. I have this enabled in order to let Tasker see notifications from Gmail and run a task based on them.
Tasker also requires device administrator privileges for certain features, like manipulating the status of the lock code. This also has to be enabled manually, and if you do enable it, you will have to manually disable it to uninstall Tasker. This is another system level Android thing that you can read more about here.
Being rooted is not required for Tasker, but it does give it more abilities. The availability of certain actions and contexts is dependent on the device and software version/ROM, and being rooted can unlock features that are otherwise unavailable on a certain device. Tasker can also use root to kill apps, manipulate files, and so on.
There are dozens of plug-ins for Tasker, giving Tasker lots of new abilities. These plug-ins are available in the Play Store, and install as normal apps. Tasker shares the plug-in system with another automation app, Locale, and so many Tasker-compatible plug-ins are listed as Locale plug-ins. Furthermore, some apps have Tasker compatibility built in, meaning that installing the main app also unlocks the plug-in components in Tasker. The plug-ins can be accessed from either the third party or plug-in parts of Tasker (in the list of other actions/contexts) depending on whether the plug-in was built into Tasker or got installed on the side. If the accompanying app is installed, there’s no practical difference between actions listed in the third party section and those listed in the plug-in section, other than the name of the category they’re listed in.
Creating your first profile
The best way to learn Tasker is to tinker with it and explore. The configuration for each context, each action is different, and so it’s hard to generalize. The image below explains some of the buttons and options that are fairly common in the configuration screen for actions, while skipping those that are more unique to that particular task. Each action and context has different options however, and with the amount of contexts and actions in Tasker, explaining each and every one is a massive task.

There is however documentation for more or less all the features and settings in Tasker, and you can access this documentation by clicking the question mark icon present in the bottom right corner of many of the configuration screens in Tasker. You then get a brief explanation of the screen you’re on. It’s not always easy to understand the explanation, and there have been some (valid) complaints about the documentation for Tasker, but it’s still your very best friend when exploring Tasker.
The truth is that learning Tasker involves a fair bit of self study. This article, and future ones in this series, will cover how to use Tasker in general. Taking that and turning it into the specific profiles you need however requires some trial and error.
The video below shows the creation of a simple state profile with an enter task and (later) an exit task. My advise is to play around with the various contexts and actions and see what happens.
If you have any questions, don’t hesitate to ask. I’m also open to user requests for specific profiles/tasks which I can then create as examples in future parts of this series. You can also check out the Tasker tag for more articles on Tasker, but as those are written without beginners in mind, they might confuse more than anything.
Part 2 of this guide is now available here, and there are 7 parts to this guide in total. Find the complete list here.

Download: Google Play
